
Lunchtime just got a whole lot brighter, and yes, it’s as beautiful and delicious as it sounds. Imagine vibrant colors, appealing shapes, and satisfying flavors all packed neatly into one portable meal.

This isn’t just another lunchbox; it’s a miniature masterpiece designed to delight, even before the first bite.
We know you appreciate recipes that deliver on their promise, and this one is a guaranteed win for anyone looking to elevate their midday meal with minimal fuss.
Get ready to transform the ordinary into the extraordinary with this easy, yet impressive, bento box.
Quick Look: Your Fruit and Cheese Star Bento Box
Here’s a quick glance at what makes this bento box a winner for busy lunches. It’s all about simple, fresh ingredients assembled with minimal effort for maximum appeal.
- Prep time: 5 minutes
- Cook time: 0 minutes
- Servings: 1
- Difficulty: Easy
Main Steps:
- Wash and prepare fresh fruit.
- Slice apple and Brie into attractive wedges.
- Arrange all components artfully in the bento box.
- Pack crackers separately to maintain crispness.
- Secure the bento box and add an ice pack to your lunch bag.
This delightful assembly comes together in minutes, proving that a beautiful and satisfying lunch doesn’t need to be complicated. Ready to get crafting? Let’s dive into the details.
The Art of the Bento Box: Why Presentation Matters
You know that saying, “We eat with our eyes first?” It’s especially true when it comes to packed lunches, whether for yourself or your kids. A visually appealing bento box doesn’t just look pretty; it can significantly influence how much a child enjoys their meal and encourage them to try new foods.
Think about it: a colorful, thoughtfully arranged bento box sparks curiosity and excitement. It transforms a simple meal into an engaging experience, making lunchtime something to look forward to rather than a chore.
The Psychology of Appealing Food
Visually appealing food triggers positive associations. For children, this can mean the difference between hesitantly picking at their food or eagerly diving in. Bright colors and distinct shapes make the contents less intimidating and more fun.
A bento box naturally lends itself to creating this visual appeal. The compartmentalized structure allows for a beautiful arrangement of different colors and textures. This variety not only looks good but also helps introduce a wider range of nutrients throughout the week.
Principles of Color, Shape, and Arrangement
- Color Contrast: Aim for a variety of colors. Think about pairing green grapes with red apple slices and orange carrots. This visual diversity is appealing and suggests a nutrient-rich meal.
- Shape Play: Don’t be afraid to cut ingredients into fun shapes. Using small cookie cutters on cheese slices or even firm fruits can add a whimsical touch that delights. This is a fantastic way to make even simple ingredients feel special and fun.
- Strategic Arrangement: Place items neatly in their compartments. Think of it as creating a mini-meal landscape. Group similar items together or arrange them in patterns to create a pleasing aesthetic.
Tips for Using Cookie Cutters and Decorative Elements
Cookie cutters are your best friend for adding personality to a bento box. You can use them on cheese slices, slices of firm fruits like apples or melons, or even deli meats.
Beyond cookie cutters, consider simple decorative elements like a sprig of parsley for a touch of green, or using cute toothpicks to hold sandwich components together. These small additions make a big impact without requiring a lot of extra time or effort.
Mastering these simple presentation techniques can truly elevate your bento box creations, making meals more enjoyable for everyone.
Crafting Your Delightful Bento Box
Now that we have all our components ready, let’s assemble this vibrant bento box! Following these steps ensures a beautiful and practical lunch that your recipient will love. This assembly process is straightforward and builds confidence with every step.
Prep Your Produce
Start by thoroughly washing the apple and grapes under cool running water. This is a crucial first step for food safety and to ensure a clean, fresh taste. Gently pat them dry with a clean towel or paper towels.
Slice with Style
Take your washed and dried apple and slice it into attractive wedges. For the Brie cheese, cut it into similarly appealing wedges. Aim for pieces that are easy to handle and visually pleasing. Uniformity in slicing can make the final presentation even more polished.
Arrange with Care
Now for the artful part! Begin by carefully placing the apple wedges into one compartment of your bento box. Next, add the grapes to another section. Then, artfully arrange the Brie wedges. Fill any remaining space in these compartments with the baby carrots. The goal here is to create a visually balanced and colorful arrangement.
Keep it Crisp
To ensure that your crackers remain delightfully crunchy, place them in their own dedicated, dry compartment. This simple step prevents the moisture from other ingredients from softening them, preserving their texture and appeal. This is a key strategy for maintaining the integrity of dry snacks in a packed lunch.
Seal the Deal
Once all the components are perfectly placed, it’s time to close the bento box. Ensure the lid is securely fastened. This keeps everything contained and prevents accidental spills during transport.
Pack for Freshness
Finally, to ensure your bento box stays fresh and safe throughout the day, especially if it’s a warm day or a long journey, place the closed bento box into a lunch bag. Include an ice pack inside the lunch bag. This will help maintain a safe, cool temperature for all the ingredients until lunchtime.
With your bento box expertly assembled, it’s ready for its next adventure. Let’s move on to understanding why compartmentalization is so key in bento box design.
Bento Box Essentials: Compartmentalization & Food Safety
Packing a bento box is about more than just a pretty arrangement; it’s a strategic approach to meal preparation that keeps food delicious and safe.
The key lies in understanding why each element matters, from keeping ingredients separate to ensuring they stay at the right temperature.
The Magic of Separation: Preventing Sogginess and Preserving Textures
Have you ever opened a lunchbox to find soggy crackers or a sad, wilted salad? Compartmentalization is your secret weapon against this culinary disappointment.
Each section of a bento box acts as a mini-container, preventing moisture-rich foods like fruits from mingling with dry items like crackers or bread. This simple separation is crucial for maintaining the intended texture and crispness of each component, ensuring every bite is as delightful as the first.
Furthermore, distinct compartments help with portion control, making it easier to create balanced meals and manage intake.
Food Safety First: Keeping Lunches Fresh and Safe
When packing lunches, especially for children, food safety is paramount. The goal is to keep perishable items out of the temperature danger zone (between 40°F and 140°F or 4°C and 60°C) for extended periods.
Always ensure your bento box and its components are clean. Wash produce thoroughly, and if you’re including items like cheese or pre-cooked meats, make sure they are properly chilled before packing.
To maintain a safe temperature throughout the day, include a cold source in your lunch bag. An ice pack or a small frozen water bottle works wonders to keep the entire bento box cool. This is especially important if your bento box contains ingredients that require refrigeration, such as cheese or yogurt.
Avoid cross-contamination by using clean utensils for packing and ensuring different food types are kept separate, not just for texture, but also for hygiene.
By mastering these bento box essentials, you ensure that your carefully crafted meals are not only visually appealing but also perfectly fresh and safe to enjoy.
Now that we understand the fundamentals of bento box construction, let’s get creative with ingredient swaps and fun themes!
Beyond the Stars: Creative Variations for Your Bento
The basic bento box is a fantastic starting point, but the real fun begins when you start customizing it! Think of your bento box as a blank canvas, ready for your creative flair. We’re going to explore how you can easily swap ingredients and introduce exciting themes to make each lunch an adventure.
Why stick to stars when you can have a whole galaxy of flavors and shapes? Personalizing your bento box ensures it’s not just a meal, but a delightful experience. This is especially true when packing lunches for kids, but adults can certainly enjoy a thoughtfully prepared bento too!
Theme Ideas to Spark Imagination
- Animal Kingdom: Use small cookie cutters to create animal shapes from cheese slices or fruit. You can even arrange grapes to look like caterpillars or carrot sticks like playful hedgehogs.
- Color Palettes: Challenge yourself to create a bento box that sticks to a specific color scheme, like a vibrant all-red lunch (strawberries, raspberries, cherry tomatoes, red bell peppers) or a calming green spread (kiwi, green grapes, cucumber, snap peas).
- Mini Snack Platters: Replicate the appeal of a charcuterie or cheese board in a portable, portion-controlled format. Think small portions of cheese, cured meats (like turkey or ham roll-ups), olives, and a few crackers.
- Seasonal Celebrations: Adapt your bento to holidays or seasons. Think heart shapes for Valentine’s Day, orange and black for Halloween, or festive green and red for winter holidays.
Smart Ingredient Swaps and Additions
- Lean Proteins: For a more substantial meal, add a source of protein. This could be hard-boiled eggs, chicken or turkey roll-ups, edamame, or small cubes of tofu.
- Vegetable Variety: Beyond carrots, consider adding cucumber slices, cherry tomatoes, sugar snap peas, broccoli florets (lightly steamed), or bell pepper strips. If you’re looking for more ideas on incorporating vegetables into portable meals, check out our tips for healthy and portable snack components.
- Fruitful Fun: Swap apples for berries, melon chunks, orange segments, or kiwi slices. Ensure fruits that brown easily, like apples and bananas, are either treated with a little lemon juice or packed fresh right before serving.
- Grain Options: Instead of crackers, consider adding a small portion of cooked pasta, quinoa, or even a mini muffin. Just remember to keep items that could get soggy separate. For great tips on keeping crackers and other items from getting soggy, we have you covered.
Experimenting with different shapes using tools like cookie cutters can also add a playful touch. For more on creative food presentation, especially using cookie cutters for shapes, don’t miss our tips for creative food presentation.
By thinking about themes and making smart ingredient swaps, you can ensure every bento box is a unique and exciting culinary creation. Now, let’s think about what essential components make a bento box function so well.
Your Bento Box Questions, Answered!
What makes a bento box appealing for kids?
Visual appeal through colorful ingredients, fun shapes (like stars!), and neat arrangements in separate compartments makes bento boxes exciting for children.
How can I make my bento box ingredients look more exciting?
Use cookie cutters to create fun shapes from cheese and fruit, arrange items in distinct sections, and consider colorful pairings like fruits and veggies.
How do I prevent crackers or bread from getting soggy in a bento box?
Pack crackers and bread in a completely separate, dry compartment, or use a small container to keep them crisp.
Can I prepare a bento box ahead of time?
Yes, most components can be prepped the night before, but it’s best to slice fresh fruit like apples right before packing to prevent browning.
Did You Make This Delightful Bento?
We hope you loved assembling this bright and cheerful bento box! Seeing your creations brings us so much joy.
If you made this delightful bento, please share your experience by leaving a rating and a comment below. We can’t wait to see what you’ve put together!
Follow us on Pinterest and Facebook for more delicious recipes and tips!
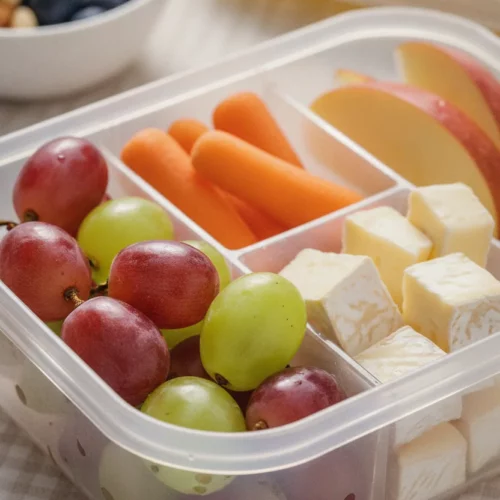
Fruit and Cheese Star Bento Box
Equipment
- Bento box
- lunch bag
- ice pack
- Cookie Cutters
Ingredients
Produce
- 1 apple washed and prepared
- 1 cup grapes washed
- 1/2 cup baby carrots
Cheese
- 2 oz Brie cheese sliced into wedges
Dry Goods
- 1 serving crackers packed separately
Instructions
Main Steps
- Wash and prepare fresh fruit.
- Slice apple and Brie into attractive wedges.
- Arrange all components artfully in the bento box.
- Pack crackers separately to maintain crispness.
- Secure the bento box and add an ice pack to your lunch bag.
Prep Your Produce
- Start by thoroughly washing the apple and grapes under cool running water. This is a crucial first step for food safety and to ensure a clean, fresh taste. Gently pat them dry with a clean towel or paper towels.
Slice with Style
- Take your washed and dried apple and slice it into attractive wedges. For the Brie cheese, cut it into similarly appealing wedges. Aim for pieces that are easy to handle and visually pleasing. Uniformity in slicing can make the final presentation even more polished.
Arrange with Care
- Now for the artful part! Begin by carefully placing the apple wedges into one compartment of your bento box. Next, add the grapes to another section. Then, artfully arrange the Brie wedges. Fill any remaining space in these compartments with the baby carrots. The goal here is to create a visually balanced and colorful arrangement.
Keep it Crisp
- To ensure that your crackers remain delightfully crunchy, place them in their own dedicated, dry compartment. This simple step prevents the moisture from other ingredients from softening them, preserving their texture and appeal. This is a key strategy for maintaining the integrity of dry snacks in a packed lunch.
Seal the Deal
- Once all the components are perfectly placed, it's time to close the bento box. Ensure the lid is securely fastened. This keeps everything contained and prevents accidental spills during transport.
Pack for Freshness
- Finally, to ensure your bento box stays fresh and safe throughout the day, especially if it's a warm day or a long journey, place the closed bento box into a lunch bag. Include an ice pack inside the lunch bag. This will help maintain a safe, cool temperature for all the ingredients until lunchtime.